Showing posts with label Tutorial. Show all posts

08 October 2011

Printing with too little fabric

Occasionally (frequently), I find myself just short of the desired size of fabric when I want to print something with Inklingo.

Example : I want to make some small Broken Dishes blocks. For that, I need HST.
What is more, I would love to have them finish at 3", because then I can make them work with the 6" format that I mostly use for my block-experiments.
Now, to print a total of 8 HST, each 1.5" with Inklingo, I need a piece of fabric which is 5.25 x 5.5", BUT, I would so much like to use some (prewashed) 5" charms (which, after washing, are then more like 4.75 x 5").

Here's what I do :
Cut the freezer-paper 5.5" square.
Set the printer's Custom-size to 5.5" square

On the plastic-side of the freezer-paper, print the desired shape. In this case, 1.5" HST in Layout 1. Print it with colour 00. It really doesn't matter if you can see the actual print here. What is important is, that you can see the rulers that are on top of and to the left of the print proper.

(click on picture to see more clearly ... and yes, I can barely see the 00-colour print on this sheet of paper. I can, however, see the ruler-lines fairly clearly).

Take the 5" square.
Position it so that it just (barely) covers the straight line of the printed (and visible) ruler. (again, click on picture if you have trouble seeing what I mean)
Iron in place.

IF your iron gets slightly gunky from this exercise, take a brown paper-bag (or another uncoloured piece of scrap-paper), place it over the edge of your ironing-board, and run the sole of your iron over the edge a few times. This will do away with most gunk on the sole of your iron (trick learned in clothes-construction class; it works when you want to remove remnants of fusibles like vlieseline or steam-a-seam from the sole of your iron).
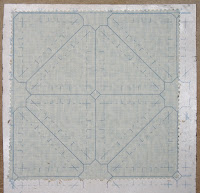
Print normally ! staying with the 5.5" user-defined / custom-size of setting.

As you can see, the fabric just (just !) covers enough of the print to give me both cutting- and stitching-lines for all 8 HST.


The general principle can be used with any (custom) size paper. Set your setting to the size paper you need, and you can (just) make do with a piece of fabric which is up to 0.5" smaller on one or both sides.
It is a particularly useful trick to do, when you - like the case is in this example - have a certain size pre-cut, and need just that teeny little bit more fabric to make it really work.


... oh, and my printed 5" charms ?
They are made into Broken Dishes and Pinwheel blocks, and I'm doing them as Leaders-Enders (thank you for the term, Bonnie Hunter)
And yes, in the fullness of time, there will be enough for a quilt :-)


... in the fullness of time :-)

24 September 2011

That extra bit for the Sunflower

I've had a question : That extra bit for the Sunflower, the 'small outer-triangle, large inner-triangle combo' thingie. How have you drafted it.

Easy-peasy.

Use 2 sheets of freezer-paper.
From the 6" Sunflower collection, print a sheet of Outer Triangles
From the 12" Sunflower collection, print a sheet of Inner Triangles

Make sure your sheet of freezer-paper is big enough to yield 16 bits. I just printed on a Letter size (8.5 x 11") piece of freezer-paper. That got me too many bits, but that's ok.

Cut out 16 of each shape leaving the Seam Allowance in place.

On the 12" Sunflower Inner Triangle bits, cut away the bottom (curved) seam allowance.

Iron the outer-triangle bits on top of the inner-triangle bits (see picture on the right)

You can leave the seam-allowance on your templates, or you can cut them away. It all depends on how you prefer to prepare a block with freezer-paper rather than Inklingo.

I chose to leave the seam-allowance on. That way, I can place the composite templates right up to each other, and know I have the seam-allowance in place.

If you do that, you - again - have two options :
Draft the stiching-line on the fabric-piece, or not draft the stitching-line.
If the rest of your Sunflowe is prepared with Inklingo, you do not need a stitching-line, because there are stitching-lines on every piece it is going to be joined to. Just peel off the paper and you're ready to roll.


BUT, some of you might want a stitching-line anyway, in spite of it being unneccesary. I would suggest that you draft that before peeling off the freezer-paper.
I would further suggest, that you place your ruler so the 0.25" mark is just outside of the paper. Just. Not visibly away from it, just ... just outside.
When you draft your stitching-line (using a fine-line pencil), it will be placed right :-)
Click on the picture (right) to see it in a larger size, you will be able to see what I mean.

... but really, you don't need that stitching-line. You have perfectly good stitching-lines on the other pieces, and since you've used Inklingo to prepare everything (including the templates for this bit), it will all fit together nicely.

12 August 2011

Hybrid-piecing Hexagons


Hand-piecing hexagons is - for me - the natural way to do it.
Occasionally (rarely, but it happens) I get impatient and feel that I 'need' to move forward faster, and that is when machine-piecing comes into the picture.

BUT, machine-piecing hexagons seems to me to be a cruel and unusual way of doing hexagon-blocks. My sewing-machine and I like each other well enough - most of the time - but we are not on what you might call intimate terms, and me doing inset seams of any kind on the machine is not a sight to be soon forgotten (no matter how fervently you might wish that it was, and that your ears would stop burning)

Hybrid-piecing to the rescue !

Machine-piece the straight, not-inset seams, and then hand-piece the 'troublesome' inset seams. And because that sounds complicated (but isn't) here is a small description, with pictures.

I would like, at this point, to apologize for the quality of the pictures. I am not a professional photographer, and getting clear pictures when doing closeups like this, is - frankly - a bear to do. Know that I did it as well as I could. If you have trouble seeing how a picture could possibly illustrate the point I'm trying to make, double-click on it, and it will open 'on its own' in a (much) larger size.


Lay out your block (in this case, a double GFG-flower). I prefer to lay it out with the back up.
(and yes, eagle-eyed reader, there is a number on one of the hexagons. That is because it is printed from the CD. These hexies have been around for a loooong time)


Machine-piece into what might be called hexagon-strips.

Piece edge to edge (!)


When cutting the pieces apart, trim the thread on both sides, so that no ends 'stick out'. On the picture (right), you can see that one side of the seam has been trimmed, the other hasn't.
Trim them all.

Doing this means, that you can 'open' the seam when hand-piecing the strips together, but it still leaves just (!) enough thread to ensure that the whole seam doesn't unravel on you. If you feel iffy about having only 0.25" of thread-end between you and an unraveling seam, clip the thread a little bit further out, and then, with your needle, unpick one stitch at each end. You can do that while piecing.

If you want to press as you go, this is the point where you press the strips.
It isn't necessary, because the rest of your stitching will be by hand, so you can just leave well alone and press it all when the flower is finished. If you really want to press, press all seams the same way. Yes. Same way. It will work out and will press up a treat in the end.


Once all the strips for the flower has been machine-pieced, the hand-piecing part comes.
Since your pieces have been prepared with Inklingo, use a plain running-stitch.

At corners, take a backstitch, so you get both of two pieces anchored to the same match-mark on the single-piece (click on the picture if you have trouble seeing the back-stitch ... I do). Do not break the thread, but 'pass' from one hexagon to the next until the whole strip has been pieced.
Then move on to the next one.


When all the hexagon-strips have been joined, press your double hexagon flower.

It will press flat a treat, and all the intersections will open beautifully.


Requirements :
One of the (many) Inklingo 60-degree hexagon-collections.
1 flower-centre hexagon
6 inner-flower hexagons
12 outer-flower hexagons

Repeat as desired :-)

25 July 2011

Washing fabric


I always wash my fabrics before storing them on my shelves.
Always !

I think I have one JellyRoll that is still wrapped tightly, with the ribbon, that isn't washed, but other than that, all fabric on my shelves are washed. Yes, that includes 5" charms, 10" squares and the other small bits.

Now, washing F/4s and even F/8s is easy. Pop them in the washing-machine with the rest of it, and you're done.
Washing charms, or even the 10" squares, is worse. Popping a small bit of fabric, with nothing but 'loose' sides into the washing-machine, makes for lots and lots of fluff in the load, and might unravel more than one is ready to loose, so, here's what I do :

Using the hottest water I can wring from my tap, and a bit of (mildish) soap, everything is dumped into the hand-wash basin in the bathroom, and left there to soak a bit.
I agitate it lightly, just enough to know I have done it, but as you can see, I have quite a small sink, and there are 40 squares, each 10" now crammed into it.
Rinse - again in water as hot as you can get it - as many times as you need to get all the soap out. On the last rinse, do not drain (!)
Now comes the fun part.
Take off your shoes or socks (or be prepared to have them soaked) and roll up your pants / jeans (again : or be prepared to have them soaked, at least at the hem).

Take the soaking, dripping, running wet squares, one by one, and 'hang' them in your shower. Tiles or glass, either works. My shower has tiles, but I've done this in showers that have glass.

Flatten out the squares as you hang them, so there are no large air-bubble caught between shower-sides and fabrics. Don't obsess ! just ... do it.

And then, when all are plastered to the wall, leave the shower and close the door. Depending on air-humidity, you will be able to pick up almost-dry squares of fabric within a few hours. Some will have fallen on the floor before they were dry enough to store, but that's ok too : Give them a quick run-over with your iron, and they are perfect.

With 'big' pieces like 10" squares, the majority will loosen before they are completely dry. With 5" charms, the majority will stick until they are completely dry.

The beauty of this way of doing things is :
You get your fabric washed.
You don't get fabric that is impossible to iron out.
The majority of shrinking has now happened, AND, whatever nastiness the producer has treated the fabric with, is now out, and even scent-allergics (like yours truly) can handle them without fear of a fit.
And that's the way I do it here in Copenhagen.